 Chimney Flue Lining Image
 by www.fluesupplies.com
So shorty after moving in to our lovely new home, we decided for a number of reasons that we needed a log burner.
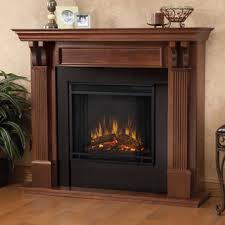
We had an existing fireplace, though I don't know how long since it had been used. I figured it was better to go with a cast iron log burning stove, as a friend told me these were a lot easier to light and keep burning, as well as having a better output. While it looks romantic and all that, I didn't like the idea of an open fire spewing sparks out onto the carpet – too much fire risk for me!
It turns out that getting a log burner installed isn't just a case of turning up and connecting it to the chimney. Who knew?
The very nice man came out to do a survey and said that the chimney would need lining. Apparently it was so old that the integrity of it couldn't be guaranteed, and if we didn't get it lined, we ran the risk of a multitude of sins. The first being that smoke could seap through the chimney into upstairs rooms, the second being that old soot and debris (such as old birds nests) could get ignited and start a chimney fire.
So we went with lining it!
I had no idea what would be involved, it turns out to be quite eye opening.
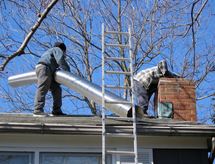
First, they erected scaffolding around our chimney and proceeded (So it seems ) to take the “top” off. They then pulled some flexible stainless steel tubing down the chimney, one guy at top, another working from the fireplace pulling it down with rope. After much huffing, puffing and pulling, this was in place.
The next phase involved pouring some concrete like material called vermiculite down the chimney between the liner and the brickwork, to fill in gaps and act as insulation. (they did explain this but I still don't fully understand why it needs insulation!)
Next, they rebuilt the top of the chimney with chimney pots and all that.
Last but not least, my lovely new log burning stove was fitted in the fireplace. Some solid black pipe was fitted between the top of the stove and the chimney, connecting with the flexible liner.
They then did some smoke tests, to check everything was working ok.
And voila! We now have a very cosy log burner for the winter and I'm looking forward to snuggling up in front of it. (I won't be fetching the logs thought -that's the “other halfs” job!)
We had an existing fireplace, though I don't know how long since it had been used. I figured it was better to go with a cast iron log burning stove, as a friend told me these were a lot easier to light and keep burning, as well as having a better output. While it looks romantic and all that, I didn't like the idea of an open fire spewing sparks out onto the carpet – too much fire risk for me!
It turns out that getting a log burner installed isn't just a case of turning up and connecting it to the chimney. Who knew?
The very nice man came out to do a survey and said that the chimney would need lining. Apparently it was so old that the integrity of it couldn't be guaranteed, and if we didn't get it lined, we ran the risk of a multitude of sins. The first being that smoke could seap through the chimney into upstairs rooms, the second being that old soot and debris (such as old birds nests) could get ignited and start a chimney fire.
So we went with lining it!
I had no idea what would be involved, it turns out to be quite eye opening.
First, they erected scaffolding around our chimney and proceeded (So it seems ) to take the “top” off. They then pulled some flexible stainless steel tubing down the chimney, one guy at top, another working from the fireplace pulling it down with rope. After much huffing, puffing and pulling, this was in place.
The next phase involved pouring some concrete like material called vermiculite down the chimney between the liner and the brickwork, to fill in gaps and act as insulation. (they did explain this but I still don't fully understand why it needs insulation!)
Next, they rebuilt the top of the chimney with chimney pots and all that.
Last but not least, my lovely new log burning stove was fitted in the fireplace. Some solid black pipe was fitted between the top of the stove and the chimney, connecting with the flexible liner.
They then did some smoke tests, to check everything was working ok.
And voila! We now have a very cosy log burner for the winter and I'm looking forward to snuggling up in front of it. (I won't be fetching the logs thought -that's the “other halfs” job!)
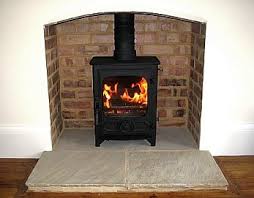
Woodburner image by Avon Forest Chimneys
